Dear all,
I apologize for the delayed update this month. I came down with the flu and, although the fever has subsided, I've been dealing with persistent coughing and fatigue, which made it difficult to to update more public assets this month.
However, I'm now well enough to share some insights about my creative process today.
Some might find this behind-the-scenes perspective even more valuable than the assets themselves.
If you have any questions or would like to discuss anything further, please don't hesitate to:
Leave a comment
Email me at chambersu1996@gmail.com
Join my Discord channel: https://discord.gg/XAfS57Rrj6
I'll respond as quickly as possible.
Thank you for your understanding and continued support!
###
Here are the updated assets from early this month's work. (~1.78GB)
20250328Post.zip
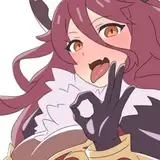
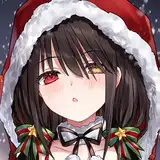
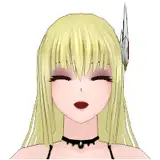
Anime Face Design from Real Face Workflow/LoRAs, 
-Drag the generated images "ILTileUpscale" to ComfyUI to load the workflow.
-Based on the real face generation "F1TileUpscale", which can be loaded too.
-New LoRA "WOFHeadIL" and its training data set from Tactics Ogre Wheel of Fortune.
-We can check the metadata like training info/tags on LoRA Metadata Viewer
The goal of this workflow/asset is to create distinctive anime faces that avoid the common problem of characters looking too similar.
while keeping reasonable 3D proportions compatible with Face Builder.
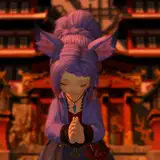
SRPG Character turn design update

- Drag the generated images "FanArtSuitADetailer" to ComfyUI to load the workflow,
- Tweaked the workflow more suitable for AI 3D,
- Improved a Turn LoRA "RPGTurnIL" and two style LoRAs, "TacticOgreWOT" and "FFT",
- Tested more 3d character generation by Rodin,
I uploaded "Leo" as an example this time,
will post all of them after finishing/polishing~
Isometric grid map design workflow/LoRAs

Current workflow/LoRAs are still in development,
(Generate level design first,
Then pick grid design from level design to improve and model as 3d models,
Then use these models to rebuild the whole 3d environment.)
After weeks of testing, the results aren't yet satisfactory,
Will share improved version when ready~
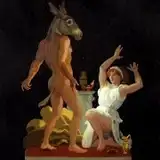
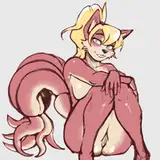
Non-Exclusive asset Female Royal Guard Suit
 will improve a special version for the project/for better final render results,
to fix some problems like its pattern making is not reasonable,
buttons, folds, wrinkles issues,
Also, the helmet should be able to be worn on/off with a reasonable structure...~
Batch 1 Rodin character models sketches
 I began to align head, hair, body, and suit meshes before texture projection/retopology, from no.1 to 5, then I got the flu and had to take a rest first.
won't create more sketches before I finish what I have now,
5+17+4=26 characters at least, some old assets I want to update/improve too.
As we know, AI can now easily generate cool concept art.
However, my focus is on lots of character designs in a consistent theme and style,
ensuring they look high-quality and harmonious, as if they all belong to the same world.
Additionally, these designs should effectively guide 3D modeling and texturing,
with the final renders closely matching the original concepts.
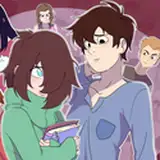
This prevents confusion within the team, such as:
- A single character having multiple conflicting designs (e.g., the same face with two different looks).
- Team members interpreting the same reference material differently (e.g., artists creating assets based on one design, while the director expects something else).
Such inconsistencies lead to costly iterations and frustration.
The final designs must be precisely what we want before moving to modeling—predictable, feasible, and visually appealing to streamline production.
The workflows include suit, hairstyle, bald head/face, and naked body turntable design.
I will detail how the workflows work with an example, the suit turntable design of "Leo",
At first, set up ComfyUI and custom nodes,
I used a portable ComfyUI pack,
Then, dragged the image to ComfyUI to load the workflow.
If it raises information for missing custom nodes,
Use the ComfyUI Manager's button "Install Missing Custom Nodes"
Then, place the downloaded models in the right path, and we should be able to run the workflow.
We can expand the basic text-to-image(T2I) to what we want step by step,
1. "Ksampler", the core node for the basic T2I, we used the default KSampler with default params first,
2. "Load VAE", influences the color, but we can tweak later in many ways, so not important to pick which one here.
3. "Load Checkpoint", influence main styles, elements, and the ability to understand prompts,
We used the merged Illustrious(IL) model here to get better anime characters and keep the balance between quality and speed.
4. Prompt nodes for positive and negative text, we used some simple words first here.
5. Empty latent node to control the size of the generated images here, IL is better at around 1024, so we use 1536*1024 here.
6. Finally, we add VAE Decode and Save/Preview Image nodes to output the results,
Link all above and press "Queue Prompt" to get the first image for this test.
The next step is about LoRAs (Low-Rank Adaptation),
7. Add several LoRAs nodes between the checkpoint and sampler/prompt nodes.
We should be able to get a more suitable style, 
I used my tested LoRAs array here, two turntables LoRAs and two style LoRAs,
Their weight values are tested magic numbers.
(I found arrays work much better and are easier to train with isolated data sets in different styles)
The point here is how to train LoRAs we want.
Different people have different ways/understanding to train.
As for mine, I posted here before, I will focus on the workflow this time~
After LoRAs, we can get good reference materials, but not useful enough for modeling and textures, so we will add Openpose CtrlNet to get a standard turntable design.
8. Load the OpenPose model and OpenPose reference image, and use Apply ControlNet to link them to the prompts and the sampler, tweak the strength/start/end.
9. I also used "Seed Everywhere", "String Literal", and "Join String Multi" nodes for a fixed random seed "2" and organized complex prompts here.
The common parts of the prompts are from long-time testing, and hard to explain why,
They are a kind of experience, like all the magic numbers here,
The parts to describe how the character looks are based on Joy Cation, integrated from the reference picture.
Also tweaked "cfg" and "sampler name" of the KSampler here.
After this section, we can try different inputs to preview and find the suitable presets we want.
The next steps are about polishing and detailing,
We will use the Upscale Model to upscale the images,
and use Image-to-Image(I2I) to fix the details, called HiResFix on WebUI. 
10. Use "Load Upscale Model" and "Upscale Image (using Model)" to upscale the image 4 times,
Then use "Upscale image" node with "lanczos" method to resize it to 2304*1536,
(upscale too large at one time will break the consistency to make the tested small sketches less meaningful, and may cause out of VRAM when I2I).
11. Use "VAE Encode", "KSampler" with 0.2 "denoise", and "VAE Decode" with "Save Image" for I2I.
Then we can also use the tile upscale (I2I upscale tile by tile to save VRAM),
GitHub - atdigit/ComfyUI_Ultimate_SD_Upscale
and (Face) After Detailer (face detection to I2I) to improve the results if needed,
GitHub - ltdrdata/ComfyUI-Impact-Pack: Custom nodes pack for ComfyUI This custom node helps to conveniently enhance images through Detector, Detailer, Upscaler, Pipe, and more.
12. "Ultimate SD Upscale" for tile upscale.
13. "FaceDetailer" for face improvement.
For the actual workflow I used for "Leo", I replaced the "KSample" with "SamplerCustomAdvanced", which can work with "Detail Daemon Sampler" to tweak the detail amount,
GitHub - Jonseed/ComfyUI-Detail-Daemon: A port of muerrilla's sd-webui-Detail-Daemon as a node for ComfyUI, to adjust sigmas that control detail.
The rest should work similarly, but using different input to tweak the output,
These workflows should be able to provide lovely designs for special themes/styles, and help to model later.
Make sure what themes and styles we want before building workflows.
Once we decide, we can test/train to find the suitable settings.
With clear designs, we will be able to model/texture/shade/rig/animate them.
I will detail how I tried in the future,
which I may have tried and explained slightly before,
but I will work harder for them.~
Welcome to ask directly if I miss anything above, THX~
Discord Channel:
https://discord.gg/XAfS57Rrj6
Email
chambersu1996@gmail.com
Or Patreon here~